Obituary
Overview
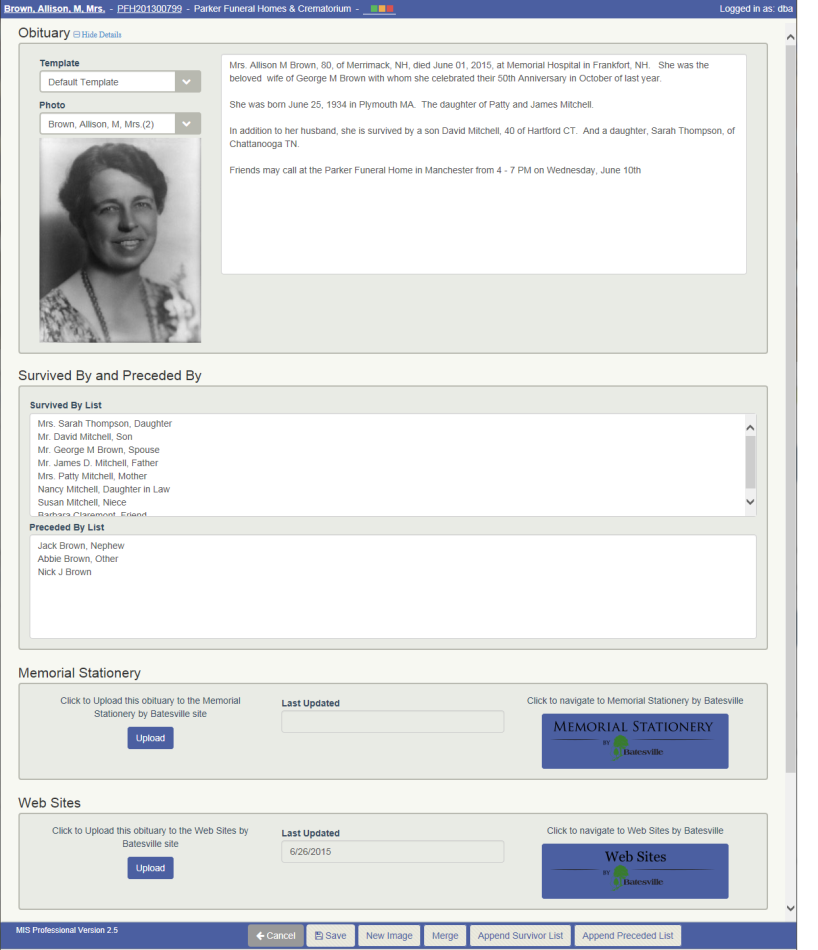
The Obituary screen allows you to add, update, view and delete an obituary photo and obituary information for the decedent associated to your Case. Users can also select and use templates (.doc) they create and load into the system via Obituary Template code maintenance.
From the Obituary screen you can also upload the obituary information entered directly to other Batesville applications:Memorial Stationery by Batesville and Website by Batesville sites. There is also the ability to upload case data to ASD and Messenger.
The Obituary screen can be accessed from the Menu bar by navigating to Cases – Obituary Information– Obituary.
Work flow
1. Navigate to Cases – Obituary Information - Obituary to open the obituary screen.
2. Update and or enter obituary text information using either the default template, manually entered information or custom templates.
3. Using the Default template and manual text:
- The obituary text field will be defaulted with information for the decedent associated to the Case similar to the following:
- Mr. Curtis James Anderson, 112, of Nashua, NH, died June 5, 2014, at Bedford, NH, born May 1, 1902
- Note: The Obituary screen’s text field uses the following default template to populate the default obituary information (taken from App_Config_Settings.Cafe_Obit_Prefix):
- The key values are: {0}, {1}, of {2}, died {3}, at {4}, born {5}.
- Which is interpreted as: (Deceased Name), (Age), of (City State), (death date in full format), at (death location), born (Birth Date in full format).
- The default text information can be edited or cleared, if you so choose.
- You can also manually type the desired obituary information for the decedent into the obituary text field
4. Using Templates:
- Create a Word document to use as a template. You would create a template if you have information that you use repeatedly (to cut down on keystrokes and user input errors).
- The templates can contain merge fields for commonly used values. For example: Deceased Name, Date of Death, Date of Birth, Birth City and State, Place of Death and Name of Spouse.
- Templates are loaded into the system using the Administration - Code Maintenance – Obituary Template screen in MIS Professional.
- On the Obituary screen, you must select a value from the Template drop down field and then click on Save to verify you want to use the template and override what is currently on screen.
- To merge the template onto the screen, click on the Merge button in the footer.
- When merged, the template text will display on screen and you will also be prompted to save or open the new merged document for your use outside of the application.
- For additional details, please contact Technical Support for assistance.
NOTE: If you want to revert back to the default template, you can select the default template from the drop-down list. As per existing functionality, in order to change the text in the text box with the merge fields from the default template, you will need to click the SAVE button and then the MERGE button in the footer. You will then need to click OK or CANCEL on the prompt confirming the replacement of all text box data.

Note that merged word document is NOT downloaded to the client when selecting the default template as there is no Word document behind it.
5. Selecting an Obituary Photo
- Click the Photo drop down arrow to display and select available obituary images
- You can select an existing or add a new obituary image
6. Adding an Obituary Photo
- Click the “New Image” button at the bottom of the screen to display the Image Information pop up window
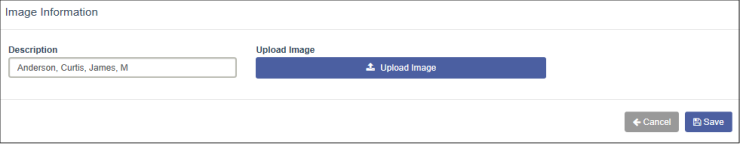
5. Enter a Description
6. Click the “Upload Image” button to select the image file you wish to associate to the case
-
Note: The Document Type is Obituary by default and cannot be change, as only Obituary Document Types will be displayed for selection in the Photo drop down selection list.
7. Click Save
Obituary Images
Obituary Images can also be added from the Imaging Screen (Cases > Artifacts > Imaging).
- For more information on adding images to a case, see the Imaging topic.
- Images must have a Document Type of "Obituary" as only Obituary Document Types will be displayed for selection in the Photo drop down selection list.
Survived By and Preceded By
You can create lists of “Survivors” and “Preceded in Death” people on the obituary screen from names entered on the Case Person and Relationships screen. These fields are also accessible from the Family Planner Obituary screen.
The Obituary includes two fields just below the Obituary section:
- Survived By List
- Preceded in Death List
These lists are populated by clicking the respective button located in the footer bar of the screen:
- Append Survivor List
- Append Preceded List
Survivor List
When the “Append Survivor List” button is clicked, the system copies the Case Names and Relationships names from the Case Person and Relationship screen that do NOT have the “Predeceased?” field checked. (The City and State of Case People, and the Hometown / Phone # of Other Relationship names are included in the copied text.)
Preceded List
When the “Append Preceded List” button is clicked, the system copies the Relationships names from the Case Person and Relationship screen that DO have the “Predeceased?” field checked
Memorial Stationery
This feature is available on the Obituary screen when a location is configured for its usage. The integration between Professional and the Memorial Stationery by Batesville application adds the ability for users to enter Obituary information one time and feed the information to the Stationery print studio.
To Use the Memorial Stationery feature:
1. Log into the MIS Professional application
2. Select a Case that is associated to a Location setup for use with Memorial Stationery by Batesville
3. Complete the Obituary screen and all required information
4. Click on the ‘Upload’ button to upload the case details to Memorial Stationery by Batesville
5. Alternatively, you can also click on the ‘Memorial Stationery by Batesville’ button on the right, and you will be logged into the Stationery site, where you are automatically brought to the case you were on in MIS Professional
Web Sites
This feature is available on the Obituary screen when a location is configured for its usage. The integration between MIS Professional and the Websites application adds the ability to enter Obituary information once (in Pro) and feed the information to the Website application
To Use the Web Sites feature:
1. Log into the MIS Professional application
2. Select a Case that is associated to a Location setup for use with the Website
3. Complete the Obituary screen, so that it is ready to be uploaded
4. Click on the ‘Upload’ button to upload the case details to the Website Obituary page
5. You can also click on the ‘Websites by Batesville’ button on the right, to be logged into the Website, where you can search all Obituaries.
NOTE: If you would like further information regarding the Stationery and Websites products, please contact Batesville Technical Support for more information.
ASD Integration

This feature is available on the Obituary screen when a location is configured for it's usage. The integration between ASD and MIS Professional allows the ability to publish Obituary details such as service and event times to the ASD website. Click here to learn more about using the ASD Integration feature.
Note: If you would like further information regarding ASD integration, please contact Batesville Technical Support for more information.
Messenger Integration

This feature is available on the Obituary screen when a location is configured for it's usage. Click here to learn more about using the Messenger Integration feature.
Note: If you would like further information regarding Messenger Integration, please contact Batesville Technical Support for more information.